Magnetic Particle Testing (MT)
03 Jul 2022 Download PDF
Magnetic particle examination (MT) is a very popular, low-cost method to perform nondestructive examination (NDE) of ferromagnetic material. Ferromagnetic is defined in ASME Section V as “a term applied to materials that can be magnetized or strongly attracted by a magnetic field.” MT is an NDE method that checks for surface discontinuities but can also reveal discontinuities slightly below the surface.
How Magnetic Particle Examination Works
When ferromagnetic material (typically iron or steel) is defect-free, it will transfer lines of magnetic flux (field) through the material without any interruption.

But when a crack or other discontinuity is present, the magnetic flux leaks out of the material. As it leaks, magnetic flux (magnetic field) will collect ferromagnetic particles (iron powder), making the size and shape of the discontinuity easily visible.
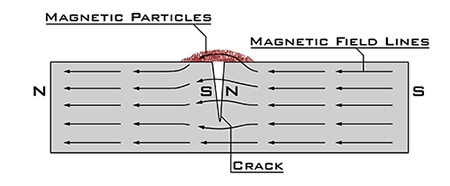
However, the magnetic flux will only leak out of the material if the discontinuity is generally perpendicular to its flow. If the discontinuity, such as a crack, is parallel to the lines of magnetic flux, there will be no leakage and therefore no indication observed. To resolve this issue, each area needs to be examined twice. The second examination needs to be perpendicular to the first so discontinuities in any direction are detected. The examiner must ensure that enough overlap of areas of magnetic flux is maintained throughout the examination process so discontinuities are not missed.
History of Magnetic Particle Examination
Magnetism was first used as early as 1868 to check for cannon barrel defects. Cannon barrels were first magnetized and then a magnetic compass was moved down the length of the barrel. If a discontinuity was present, the magnetic flux would leak out and cause the compass needle to move. Defects could be easily located with this technique.
In the early 1920s, William Hoke noticed metallic grindings from hard steel parts (held by a magnetic chuck while being ground) formed patterns that followed the cracks in the surface of parts he was machining. He also found that by applying fine ferromagnetic powder to the parts, there was a build-up of powder at the discontinuities which formed a more visible indication.
By the 1930s, MT was quickly replacing the oil and whiting method of NDE (liquid penetrant [PT]) in the railroad industry. It was quicker and did not leave behind the white powder that required clean-up. After an MT evaluation, only iron powder was left behind, which could easily fall off the part or be blown away.
Different Techniques
There are many different techniques and combinations of techniques of MT. The ASME Boiler and Pressure Vessel Code, Section V, Article 7, recognizes five different techniques of magnetization:
-
Prod technique
-
Longitudinal magnetization technique
-
Circular magnetization technique
-
Yoke technique
-
Multidirectional magnetization technique
There are two different ferromagnetic examination media: dry particles and wet particles. Both forms can be either fluorescent or non-fluorescent (visible, color contrast) and come in a variety of colors to contrast with the tested material.
Most-Used Methods
Two of the most-used methods are the stationary horizontal system, using longitudinal and circular magnetization techniques, and the very portable yoke technique.
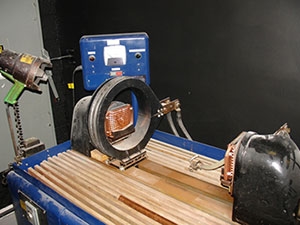
A stationary magnetic particle examination system set up for longitudinal and circular magnetization using wet fluorescent particles.
Stationary systems are generally used for smaller parts such as crank shafts and valve stems. They are often found indoors around machine shops and heat-treating facilities. Typically they have a headstock and tailstock. Parts can be clamped between stocks for magnetization. There is also a coil placed around the part to magnetize it in the perpendicular direction. Stationary horizontal systems use the wet particle technique with a circulation tank below the equipment. Wet particles flow over the examined part and drain into the circulation tank. Wet particles have more mobility flowing in a liquid than dry particles. This mobility helps sensitivity by allowing particles to easily move to the discontinuities. Fluorescent particles are commonly used with stationary horizontal systems because indoor operation makes it easy to darken the area; required ultraviolet (black) light can then be used to evaluate the parts. Both wet method examinations have about the same sensitivity, but under correct lighting conditions, fluorescent indications are much easier to see. This type of stationary system can cost $15,000 or more.
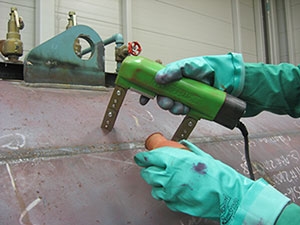
External longitudinal seam of an inservice boiler being checked with magnetic particle examination using an AC yoke with dry powder.
The MT yoke technique is the most portable and lowest-cost method, and therefore the most popular method. A typical yoke kit would cost around $750. Most yokes can operate in alternating current (AC) or direct current (DC) modes. DC gives the most penetration and is recommended if subsurface discontinuities need to be detected. AC is recommended if the surface is rough, because AC gives the particles more mobility than DC. A yoke has an electric coil in the unit creating a longitudinal magnetic field that transfers through the legs to the examined part. The yoke technique is easy to use with minimal training. It can be used indoors, outdoors, inside vessels and tanks, and in all positions. Prior to use, the magnetizing power of electromagnetic yoke shall have been checked within the past year. An AC yoke must have a lifting power of at least 10 lb and a DC yoke of at least 40 lb.
Basic Steps
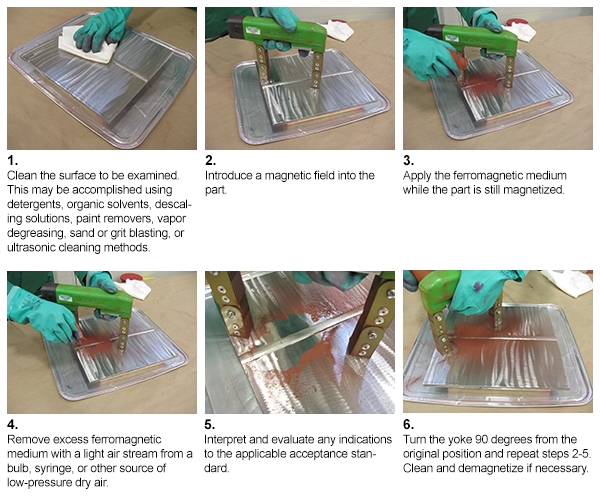
The following illustrate basic steps to use with the dry powder, non-fluorescent, yoke technique. Prior to the start of examination, all equipment and meters shall be calibrated in accordance with ASME Section V, Article 7.
ASME Section V, Article 7 requires the magnetic particle visible method (color contrast) be evaluated with a minimum light intensity of 100 footcandles on the part surface. The proper quantity of light must be verified using some type of calibrated light meter and witnessed and accepted by the inspector. If fluorescent magnetic particles are being used, a black light shall achieve a minimum of 1,000 microwatts per square centimeter on the examined surface. If alternate wavelength light sources are used to provide ultraviolet light, causing fluorescence in the particles, it shall be qualified in accordance with ASME Section V, Article 7, Appendix IV.
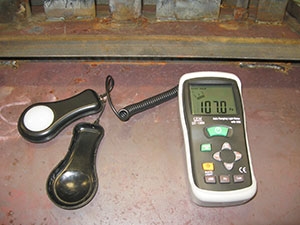
Light meter showing 107.0 footcandles of light.
Typical Examples of ASME Code-Required Inspections
In the ASME codes of construction, magnetic particle examination or liquid penetrant examination is specified many times to detect the possibility of surface defects. If material is nonmagnetic, the only choice is liquid penetrant examination. However, if material is ferromagnetic, magnetic particle examination is generally used. Some typical examples of ASME Code-required inspections include, but are not limited to:
-
Castings for surface defects
-
Plates for laminations in corner joints when the edge of one plate is exposed and not fused into the weld joint
-
Head spin hole plug welds
-
Weld metal build-up on plates
-
Areas where defects have been removed before weld repair
Once boilers and pressure vessels are in service, MT can be a widely-used examination method. The National Board Inspection Code (NBIC) specifies MT may be used for the inspection of items such as:
-
Internal and external surfaces of boiler and pressure vessels
-
Vessels in liquid ammonia service
-
Components subjected to fire damage
-
Locomotive and historical boilers
-
Yankee dryers
-
Cargo tanks
-
Vessels in LP gas service
-
Weld repairs and alterations to pressure-retaining items
Typical Inservice Inspections
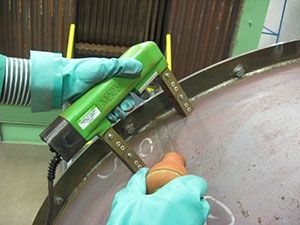 MT examination of the longitudinal seam on an inservice boiler. |
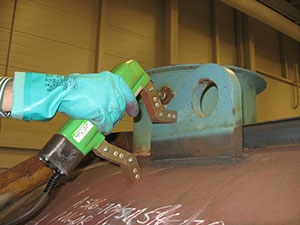 MT examination of a lifting lug weld on an inservice boiler. |
|
|
|
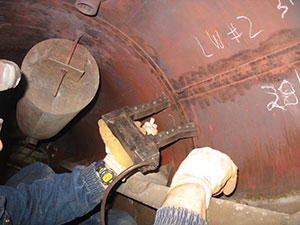 Use of an AC yoke in the MT process to detect fatigue-type discontinuities in welded seams of a steam drum during inservice evaluation. |
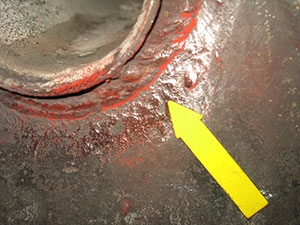 Crack in seal weld of boiler tube to steam drum discovered with MT. This was the result of improper repair procedures. |
|
|
|
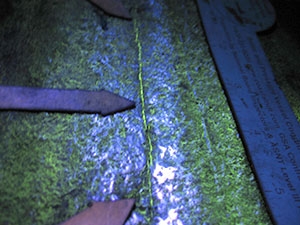 Wet fluorescent MT process showing a crack in a steam drum circumferential weld seam. |
|
Watertube Inspection
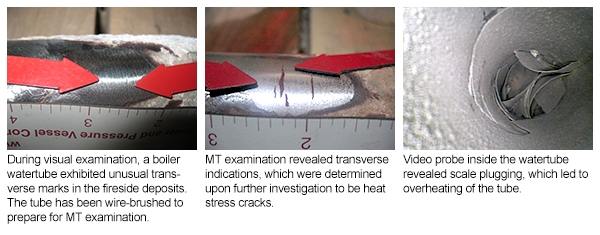
Photos courtesy of Coastal Inspection Services
Advantages and Disadvantages of Using Magnetic Particle Examination
Advantages:
-
Can detect both surface and near-surface indications.
-
Surface preparation is not as critical compared to other NDE methods. Most surface contaminants will not hinder detection of a discontinuity.
-
A relatively fast method of examination.
-
Indications are visible directly on the surface.
-
Low-cost compared to many other NDE methods.
-
A portable NDE method, especially when used with battery-powered yoke equipment.
-
Post-cleaning generally not necessary.
-
A relatively safe technique; materials generally not combustible or hazardous.
-
Indications can show relative size and shape of the discontinuity.
-
Easy to use and requires minimal amount of training.
Disadvantages:
-
Non-ferrous materials, such as aluminum, magnesium, or most stainless steels, cannot be inspected.
-
Examination of large parts may require use of equipment with special power requirements.
-
May require removal of coating or plating to achieve desired sensitivity.
-
Limited subsurface discontinuity detection capabilities.
-
Post-demagnetization is often necessary.
-
Alignment between magnetic flux and indications is important.
-
Each part needs to be examined in two different directions.
-
Only small sections or small parts can be examined at one time.
In conclusion, magnetic particle examination can be a useful nondestructive examination method during new construction and inservice inspections. It can only be used on ferromagnetic materials; therefore, it is not the best method for all applications. For quick, low-cost inspections, MT is often the best NDE method for detecting surface and slightly subsurface discontinuities.
