Radiographic Testing (RT)
02 Jul 2022 Download PDF
Radiographic Testing or Radiographic Examination is a non-destructive testing (NDT) method for examining the internal structure of any component to identify its integrity. Radiographic Testing or RT uses x-rays and gamma-rays to produce a radiograph of the test specimen that shows changes in thickness, defects or flaws, and assembly details to ensure optimum quality. Radiographic testing of welds to en the weld quality is a widely used industry practice. Radiographic testing in welding is a highly dependable way to detect weld defects like cracks, porosity, inclusions, voids, lack of fusion, etc. in weld interiors. Because of its high dependability, radiographic testing is widely used in the oil & gas, aerospace, transport, military, automotive, manufacturing, offshore, petrochemical, marine and power generation industries.
Radiographic Testing Principle
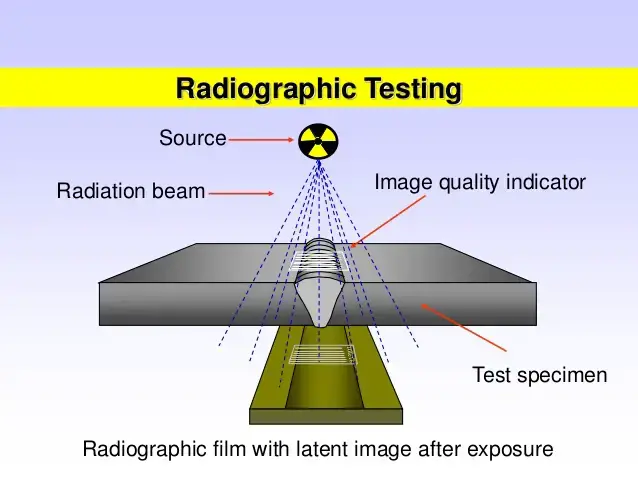
In Radiography Testing, the part to be tested is placed between the radiation source and a piece of sensitive film or detector. Once the x-ray or gamma-ray radiation is started, the test part will hinder some of the radiation by its material density and thickness. Thicker and denser material will allow less radiation to pass through the specimen. The film (or an electronic device) records the amount of radiation (known as a radiograph) that reaches the film through the test specimen. By studying the radiograph data, defects can easily be recognized. If the material is sound without any defect, entire rays will evenly pass through the material. But for materials containing flaws, rays passing through the flaws will get absorbed to a small extent due to the change in the density.
Defects in parent metal reduce its density and hence they transmit radiation much better than the sound metal. Hence the radiograph film appears to be darker at the area exposed by the defects.
The penetration power of rays are dependent on the energy of the radiation. Radiation having higher energy can penetrate thicker and denser materials. As high energy x-ray and gamma-ray are highly radioactive, local rules must be strictly followed.
In radiographic testing, defects are detected using thickness variation. So, larger the variation, the easier the defect is to detect. But when the path of rays is not parallel to a crack, the thickness variation is less and thus crack may not be visible. That’s why it is always suggested to perform radiographic testing by sending rays at various angles.

Fig. 1: Radiographic Testing
Radiographic Testing Procedure
Depending on project requirement the radiographic testing procedure will vary a little. The following paragraphs provides a sample procedural steps for radiographic testing.
-
Step 1- Surface Preparation: Surface irregularities must be removed so that they can not mask or confuse the image as defect. The finished surface of all butt welded joints should be flushed with the base material.
-
Step 2- Selecting the right radiation source and radiographic film: Depending on radiographic sensitivity and material thickness radiation source (x-ray or gamma-ray) must be decided. Fine grain high definition radiographic films can be used.
-
Step 3- Selection of Penetrameter: As per SE 142 or SE 1025 (for whole type) and SE-747 (for wire type), ASME V & ASME Sec VIII Div I, whole type or wire type penetrameter need to be selected.
-
Step 4-Radiographic testing technique: Single or Double wall exposure technique is used. Source to object and object to source distance must be established beforehand.
-
Step 5- Defect inspection and removal: The radiograph to be studied for probable defects and repaired if defect is observed.
-
Step 6- Recording: All data need to be properly recorded.
Acceptance criteria for Radiographic Testing
-
For process Piping: The acceptance criteria for radiographic testing shall be as per table 341.3.2 A of ASME B 31.3 for normal fluid service, with the exception of piping class E.
-
For structural steel: The acceptance criteria for non-tubular structure shall be in accordance with the requirement section 6.12.1 of AWS D1.1 and for tubular joints section 6.12.3 of AWS D1.1
Codes and Standards for Radiographic Testing
Widely used codes and standards for radiographic testing are:
-
ISO 5579, Non-destructive testing – Radiographic examination of metallic materials by X- and gamma-rays – Basic rules
-
ASME SE: Standard Method for Controlling Quality of Radiographic testing.
-
ASME SE 94: Recommended Practice for Radiographic Testing
-
ASTM E 801, Standard Practice for Controlling Quality of Radiological Examination of Electronic Devices
-
API 1104, Welding of Pipelines and Related Facilities: 11.1 Radiographic Test Methods
-
AASME SE V: Boiler and Pressure Vessel – Non-Destructive Testing.
-
ASTM 1161, Standard Practice for Radiologic Examination of Semiconductors and Electronic Components
-
ISO 10675-1, Non-destructive testing of welds – Acceptance levels for radiographic testing – Part 1: Steel, nickel, titanium and their alloys
-
SNT-TC-1A: Recommended Practice for Personnel Qualification and Certification in Non-destructive Testing.
-
ASTM E 592, Standard Guide to Obtainable ASTM Equivalent Penetrameter Sensitivity for Radiography of Steel Plates
-
ASTM E 1030, Standard Test Method for Radiographic Examination of Metallic Castings
-
ASTM E 1815, Standard Test Method for Classification of Film Systems for Industrial Radiography
-
EN 12681, Founding – Radiographic examination
-
ASTM E 1032, Standard Test Method for Radiographic Examination of Weldments
-
ISO 4993, Steel and iron castings – Radiographic inspection
Advantages of Radiographic Testing
The main advantages of radiographic testing are
-
Assembled components can easily be inspected.
-
Surface preparation requirement is minimal.
-
Both surface and subsurface flaws can be detected.
-
Easily verify internal defects on complex items/structures
-
Automatically detect and measure internal flaws
-
Dimensions and angles of the sample can be measured without sectioning.
-
Radiographic testing is one of the best NDT methods in lieu of golden joints.
-
can be used for a broad range of materials.
Disadvantages of Radiographic Testing
The main disadvantages of radiographic testing are
-
Highly hazardous, so proper care must be exercised.
-
High degree of skills and experience required.
-
Costly affair.
-
Slow process.
-
Two sided access of component required.
